HOME LAB RENEWAL - PT 5
Now that my two servers are built, it's time to build the ultimate VM - my daily non-work driver. There's something special about this VM though:
This will not do. In fact, it won't do at all. Other than Civilizations, which I've played since I was 11 and have owned every version since version 1, I'm not a gamer, but I shall must has 60+ FPS...in my VM.
I did a crap ton of research and there are literally hundreds of tutorials out there. After all that research, I found that my favorite beer drinking tech YouTuber Craft Computing has a whole series on how to do "physical video card passthrough from Proxmox to a Windows vm." I watched, and watched, and rewatched, but never could QUITE get it to work. Until today. This video was the inspiration, of which I will shamelessly, but with all credit to him, steal mercilessly from and add to.
First, I needed a card that would work with a pretty old Dell R730XD. A few support forums later, I was able to line up one that worked per the video, worked per the support forums, could be made to work per the manufacturer of the damn card, and I could actually figure out and afford. Behold - the Tesla M40:
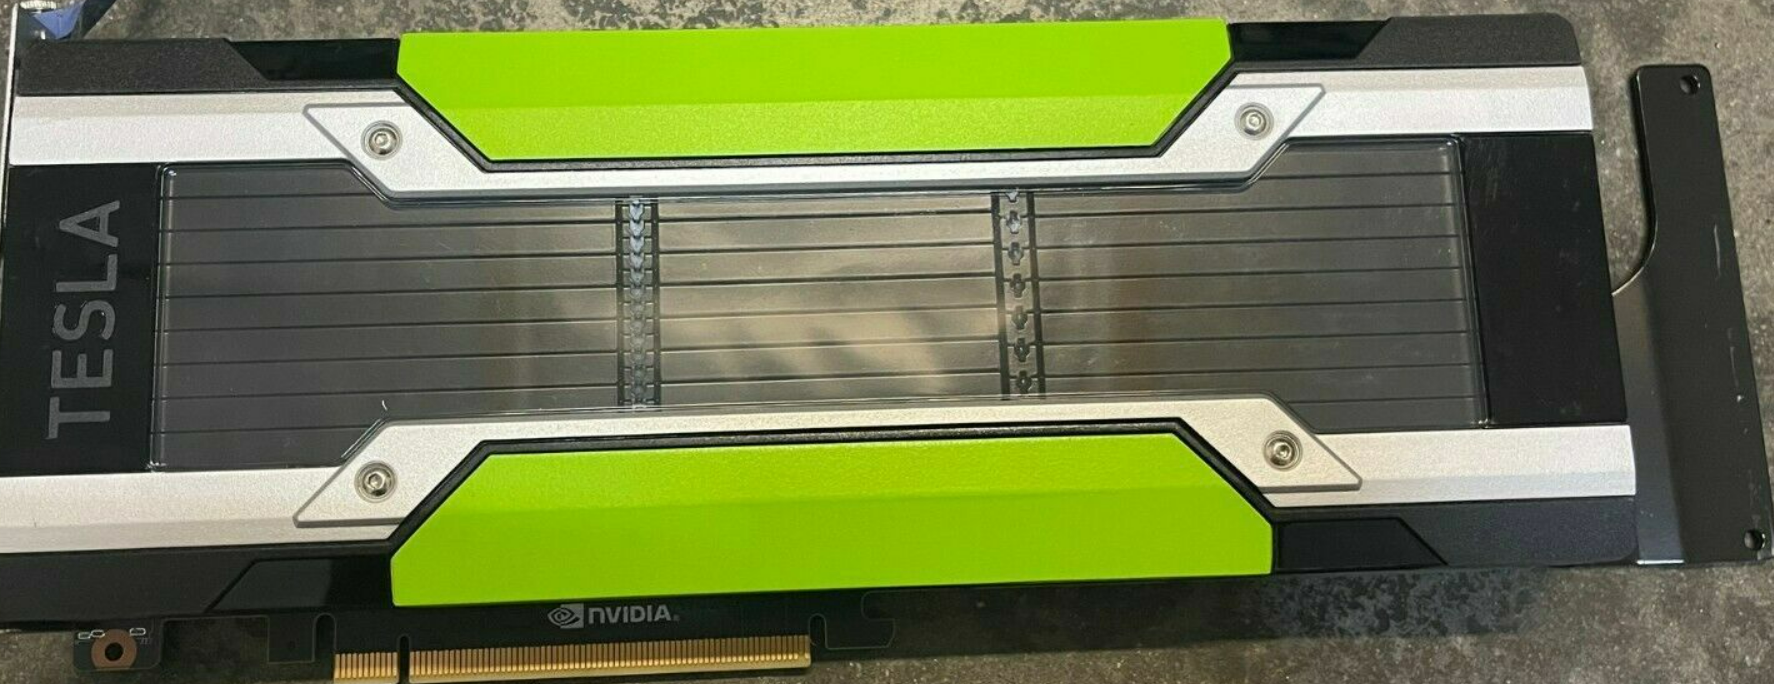
It's not an amazing card, but fits my budget, has 24GB of GDDR5 RAM, a single boss GPU, and should do nicely. Next, I realized this sucker gets hot - I mean STUPID hot. I did a few tests runs once I got it just to see if ambient air would keep it cool - it doesn't - in fact, the damn website suggests some large amount of static pressure air per minute. Otherwise, even sitting idle, it hits 60C in a hurry and firing up a simple machine attached to it will run you well past 90C and thermal throttles. Okay, so I needed to get more air to it. Enter 3D printing and a loud but not terrible fan, built just for it:
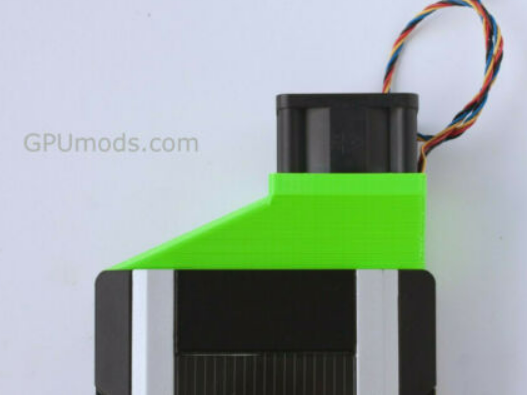
Good job GPUmods.com - $27 off Ebay. My test run worked great and it stayed under 50C given everything I could think to throw at it. Okay, now...how the heck to do this as a VM with it passed through from the host.
First, from my Dell compute box, we need to tell Linux to run IOMMU:
nano /etc/default/grub
GRUB_CMDLINE_LINUX_DEFAULT="quiet intel_iommu=on iommu=pt"
update-grub
Then, we need to enable VFIO:
nano /etc/modules
vfio
vfio_iommu_type1
vfio_pci
vfio_virqfd
Now, we need to blacklist the Linux drivers so it just sits quietly and doesn't try to mess with the card on boot:
echo "blacklist nouveau" >> /etc/modprobe.d/blacklist.conf
echo "blacklist nvidia" >> /etc/modprobe.d/blacklist.conf
echo "blacklist radeon" >> /etc/modprobe.d/blacklist.conf
update-initramfs -u
Now, when you reboot, you should see the device as an option to attach to your VM. Go to the VM Hardware page in Proxmox and add a PCI Device:

My particular card has two (one is already added) - it technically has two GPUs on there but I can only pass through one at a time. Other cards may have more and you can do amazing things like assign 1 GPU to 1 VM and another GPU to another etc. Mine cand just do 1 - no problem, my kids don't need phenomenal cosmic power. I do.
Next, I wasn't able to apply all these goodies to my existing Windows VM that I had so painstakingly migrated, but rather, only to a new VM. That's okay for me but was annoying. Create a Proxmox Windows VM like normal making sure to add the PCI device like above AND have these settings (very important):
Guest = Windows (duh)
BIOS = OVMF UEFI
Machine = q35 (the other legacy one won't work damnit!)
Also, if this is your first Windows VM on Proxmox, make sure you add a second CD ROM in addition to the ISO for Windows and pass through the ISO for VIRTIO_WIN (get the latest from GitHub) or you won't be able to see the hard drives. You have to add the driver during setup.
Once Windows is up and running, here comes the hard part - and I referred back to the Craft Computing video a LOT here, but also needed to deviate from it some. From within ProxMox, open a console to the VM.
First, here's a list of things to download:
- Windows GPU drivers: https://www.nvidia.com/drivers
- VB-Audio Virtual Audio Cable: VB-Audio Virtual Apps
- TightVNC (when you do the changes to Windows, you'll need this, but I disable it later) - Download TightVNC (install as a service)
- USBMidd (I put a copy of it on my BLOB here)
Once you have those things downloaded into your VM (you did patch too, right? RIGHT!?), now let's get started.
First, install the GPU driver, it should detect your GPU - if it doesn't, go home, you failed.
Next, go to this funky Registry Key in regedit and delete "AdapterType" entry:
HKEY_LOCAL_MACHINE\SYSTEM\ControlSet001\Control\Class{4d36e968-e325-11ce-bfc1-08002be10318}#### where #### is the one that has your nVidia card listed with it, there will be others, get the right one.
Next, install TightVNC if you haven't already. You may want to also make sure to configure a password so when you connect in a second from a client (instead of using Proxmox's console, shit will continue to work.
Now reboot the VM. Console should still work, but we want to log in to Windows using TightVNC, so, open up a VNC viewer, connect to the VM, enter your password and log in to Windows. You should see TightVNC and Proxmox console essentially mirroring each other.
Now, Unzip "usbmmidd.zip" into a folder called C:\usbmmidd and run usbmmidd.bat as administrator. Walk through installation. At this point, it's time to deviate from my Craft Computing man cause he likes Parsec, and, well, I like Remote Desktop. Obviously Parsec will give you ultimate gaming performance, but I just need good performance and my multi-monitor support which Parsec, at least as far as I can tell, doesn't.
Now, from within TightVNC window, right click on desktop, click Display Settings. Under "Multiple Displays" select "Show Only on 2" - and say bye bye to the Proxmox console (it will just go black). VNC window should keep working.
Now, open Notepad and enter this text into the first line of the blank text file:
c:\usbmmidd\deviceinstaller64 enableidd 1 and save as start.bat in the c:\usbmmidd\ folder. Open gpedit.msc and go to: Computer Configuration, Windows Settings, Scripts, Startup and add c:\usbmmidd\start.bat to the list. Press OK and close out of gpedit.msc.
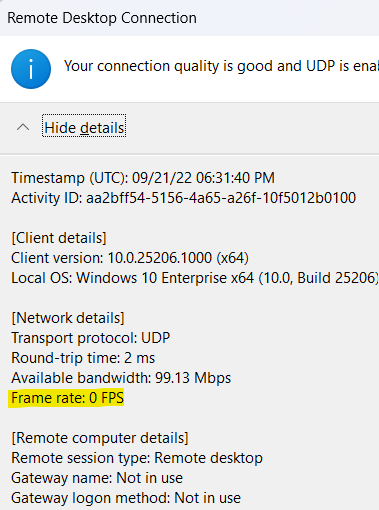
Reboot again. This time, almost everything will be good, but we're still in TightVNC which is, ewe. Now, let's get Remote Desktop to work. First, enable it if it isn't already and let's test - if you remote desktop into the VM now, you'll get the crappy 0-5 frames per second as you saw at the beginning of the article. This is because, by default, Windows uses its crappy CPU rendering and we want to force Windows to use our new GPU. So, close out of remote desktop and from TightVNC, let's perform a few last magic tricks:
Open up gpedit.msc and go to Computer Configuration, Administrative Templates, Windows Components, Remote Desktop Services, Remote Desktop Session Host, Remote Session Environment. In there, select "Use the hardware default graphics adapter for all remote desktop services sessions" and set this to Enabled to enable GPU rendering in the remote session.
Two more steps. On that same node, select "Prioritize H.264/AVC 444 Graphics mode for Remote Desktop Connections" and set to Enabled. and select "Configure H.264/AVC hardware encoding for remote desktop connections" and set to Enabled. To get things to take, from an admin command prompt, run gpupdate.exe /force.
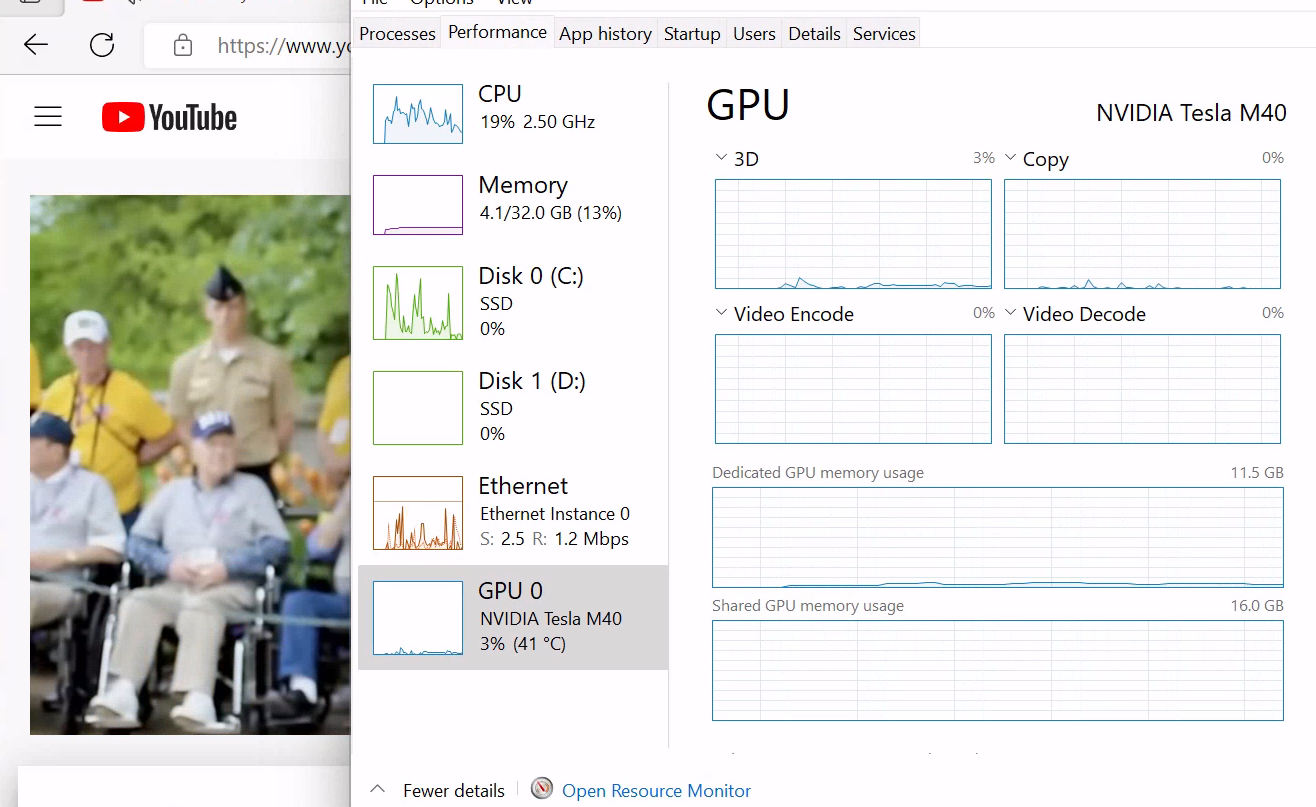
If everything worked, you can now RDP into the VM and you should see frame rates north of 30 FPS and Audio Video in YouTube SCREAMING FAST!!
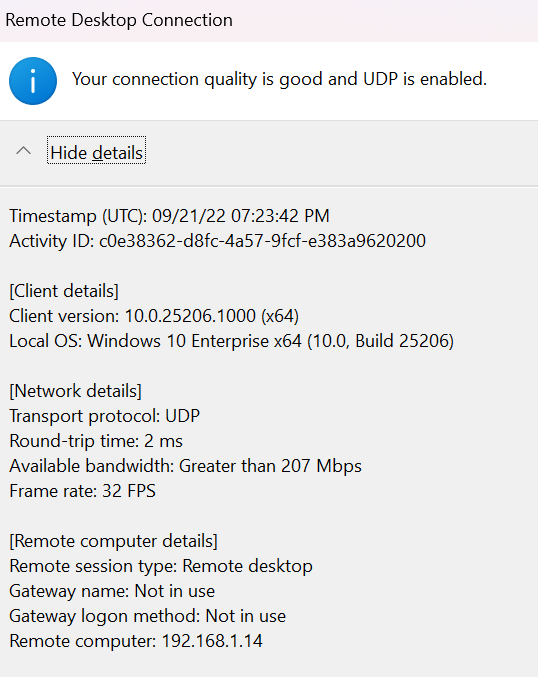
LOOK AT THAT!!!!! Plus multi-monitor support. Huzzah. SHEW, that was a lot. In my next write up, I'll tell you how to cool this bad boy without making you go deaf, or installing a server closet and AC.