From Post-It notes on your desk to detailed project management tools, there are hundreds of ways to manage your tasks. And yet, one app has continued to capture the imagination of people trying to get things done: OmniFocus.
OmniFocus was launched in 2008 and designed around the Getting Things Done (or GTD) methodology from David Allen's book by the same name. It's a powerful to-do list app for Mac and iOS that manages everything you need to do, keeping you productive by showing you exactly which task you should do next.
Whether you're new to GTD—or already use OmniFocus and want to learn how to use it more effectively—here's the tips and tricks that can make OmniFocus keep you organized and get more done.
What is GTD?
Your mind is for having ideas, not holding them.
David Allen, author, Getting Things Done
It's easy to forget things we need to do—too easy, in fact. Your brain can only remember so many things at once. When you're trying to remember the things you need to do, the ideas you just came up with, your long-term goals, and the stuff you need to pick up at the store this evening, odds are you'll forget something.
That's the core problem the Getting Things Done or GTD methodology tries to solve. "Your mind is for having ideas, not holding them," says author David Allen in his book Getting Things Done. Instead of remembering everything that needs to be done, write each task and idea down to clear out your mind.
You'll then need a system to come back and revisit those tasks—and actually get those things done. For that, GTD is a 5-step process:
Capture everything that needs to be done by writing down your tasks, ideas, projects, and more.
Clarify your ideas. Decide if they're really important—and if so, what action needs to be taken to complete them.
Organize your tasks, pulling similar tasks together to complete at once or grouping project tasks into a workflow so you do each step in order.
Reflect on your work, reviewing your projects to make sure the tasks are still relevant and to make sure you didn't forget anything.
Engage and actually do the tasks.
That's GTD in a nutshell. You'll write tasks down, organize and review them, then actually complete tasks instead of spending all your time trying to remember them. You can take it further—there's a full book on GTD, after all—but those basic steps will help you quit forgetting tasks and start getting more done.
Why Should You Use OmniFocus?
GTD doesn't require a specific app. It could work just as well with a paper notebook or the Reminders app that came with your computer or phone.
What you do need is a quick way to capture ideas and tasks whenever you think of them, along with tools to organize those tasks and review them regularly. That's what makes an app handy—especially one like OmniFocus that's designed around GTD.
OmniFocus's Mac and iOS apps—along with integrations and email support—let you quickly add tasks from anywhere. And in addition to the projects and lists you'll find in most to-do list apps, it also has tools to review your projects and organize them in ways that fit your work style.
All you'll need is its apps (starting at $39.99 each for Mac and iOS), a free Omni Sync Server account to sync the apps between your devices, and some time to organize your tasks.
Getting Started With OmniFocus
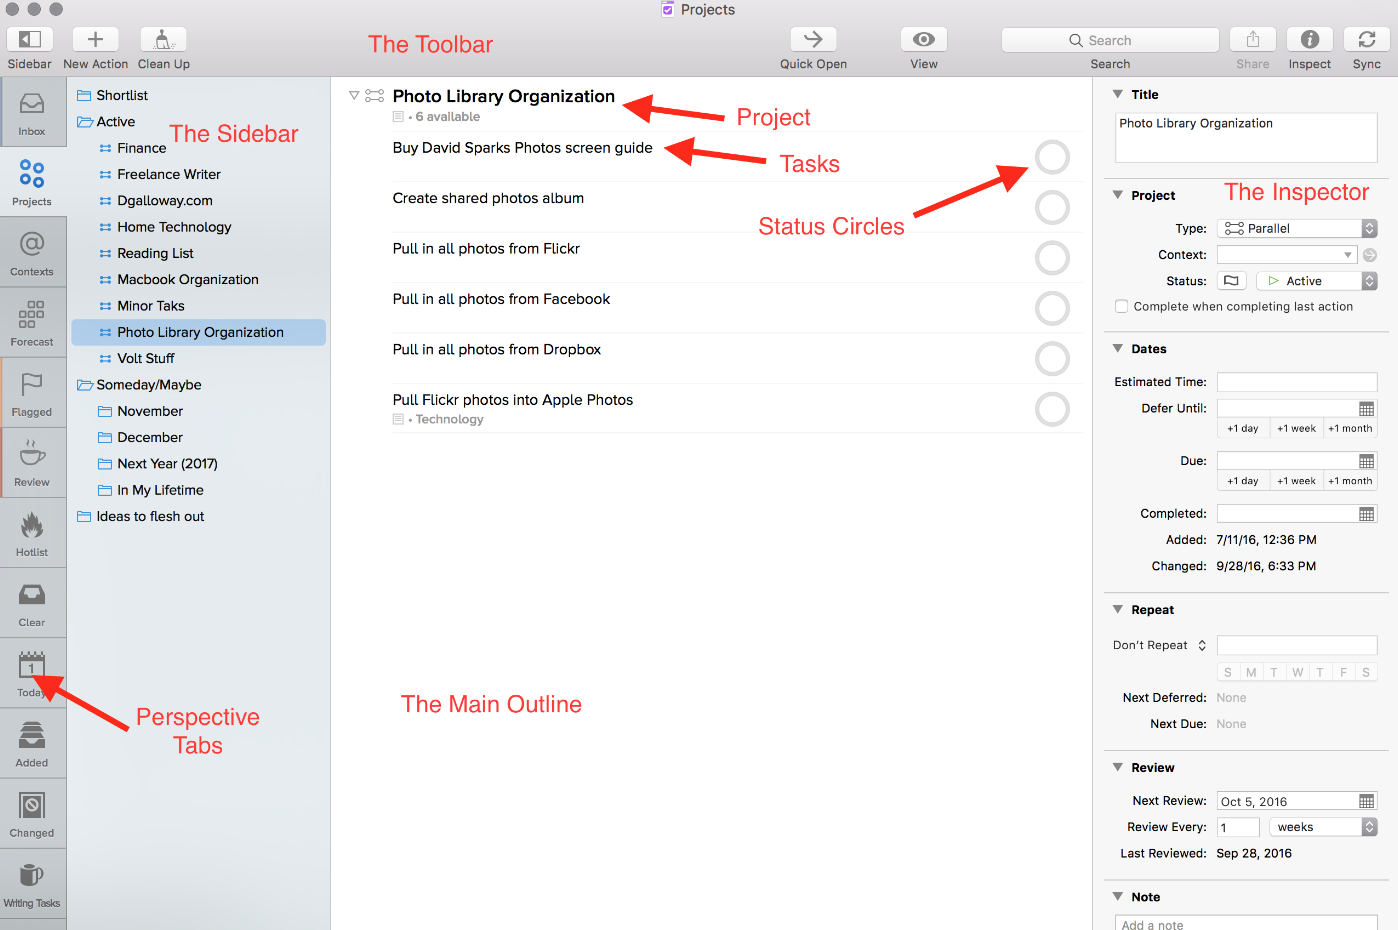
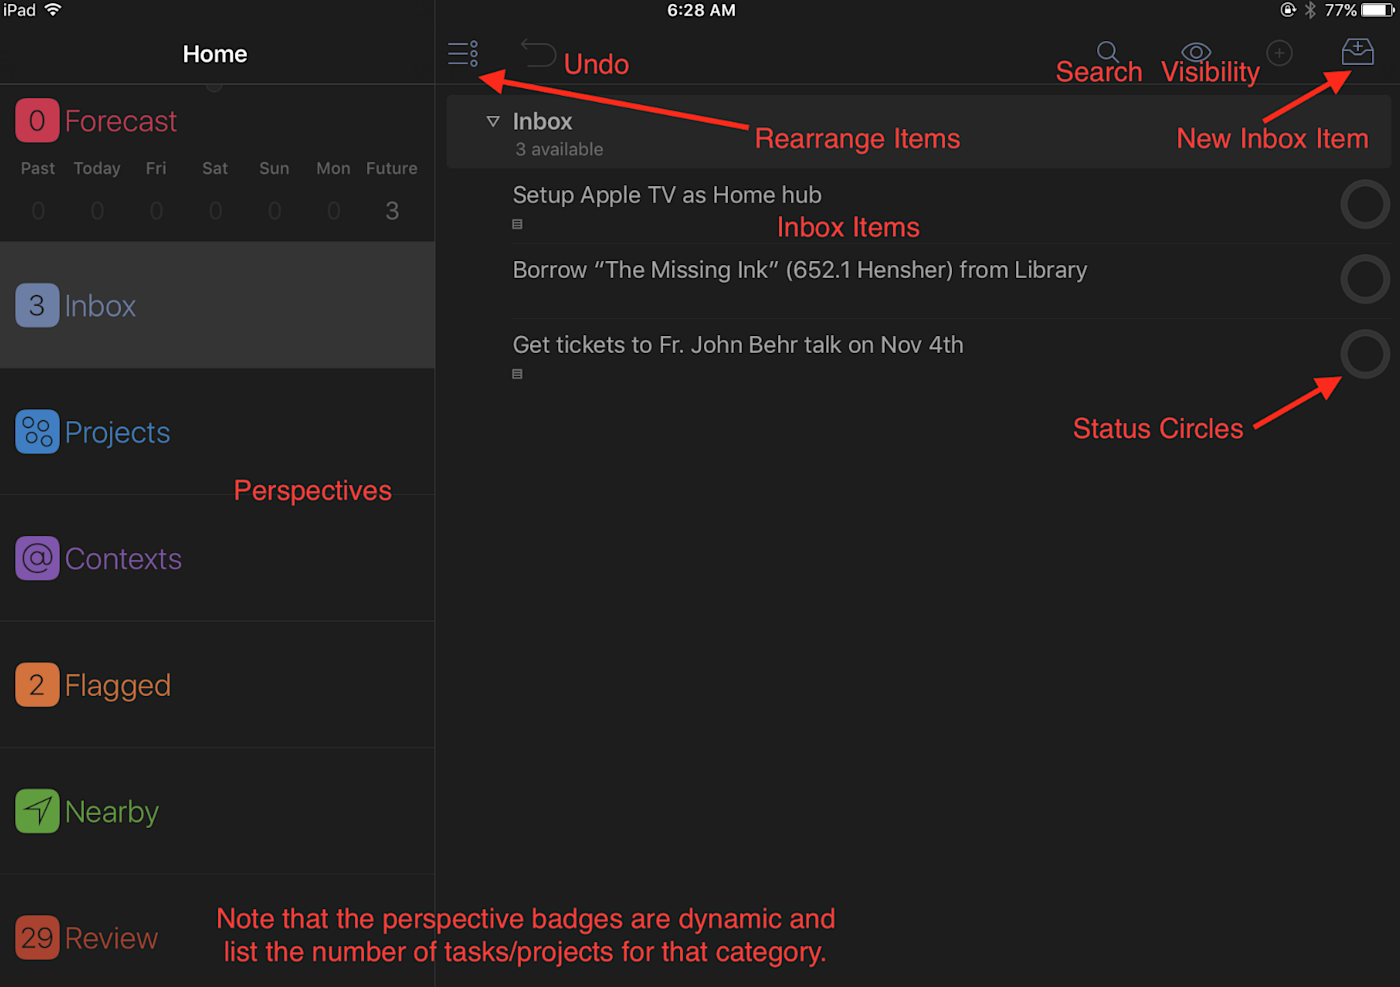
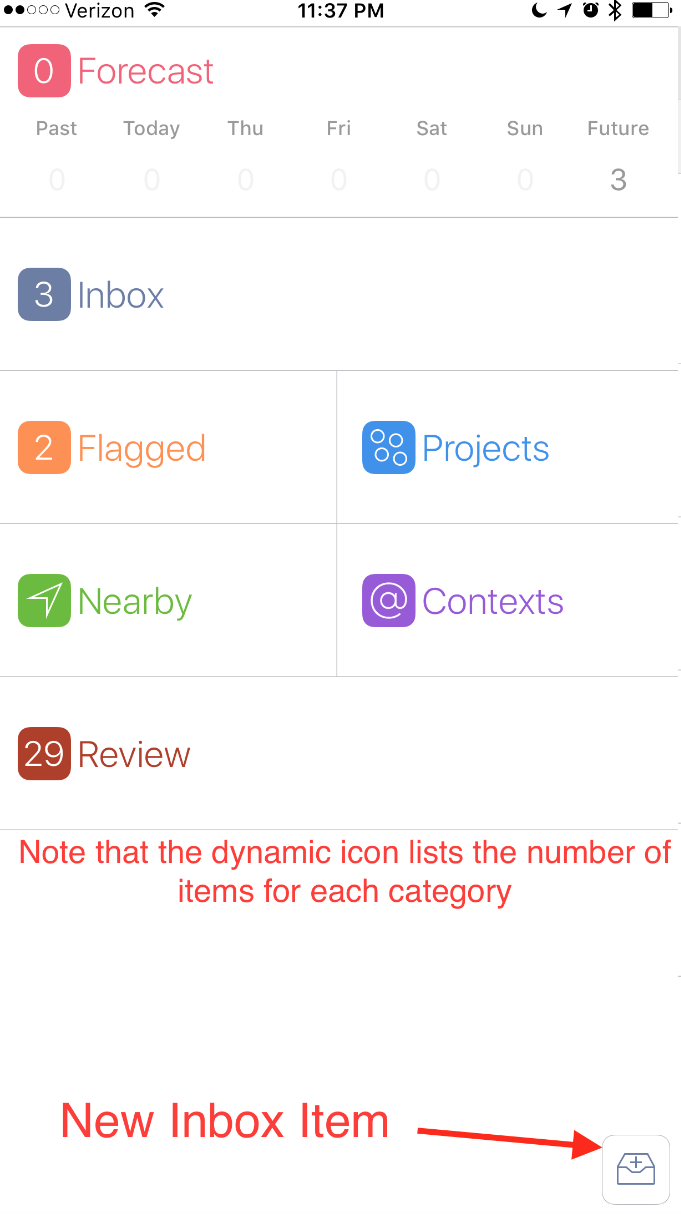
OmniFocus is a powerful to-do list tool for managing your projects, tasks, and more, so it's a bit more complicated at first glance than your average to-do list app. Here's what you'll see when you open OmniFocus on your devices:
OmniFocus for Mac User Interface:
OmniFocus for iPad User Interface:
OmniFocus for iPhone User Interface:
Setting Up OmniFocus
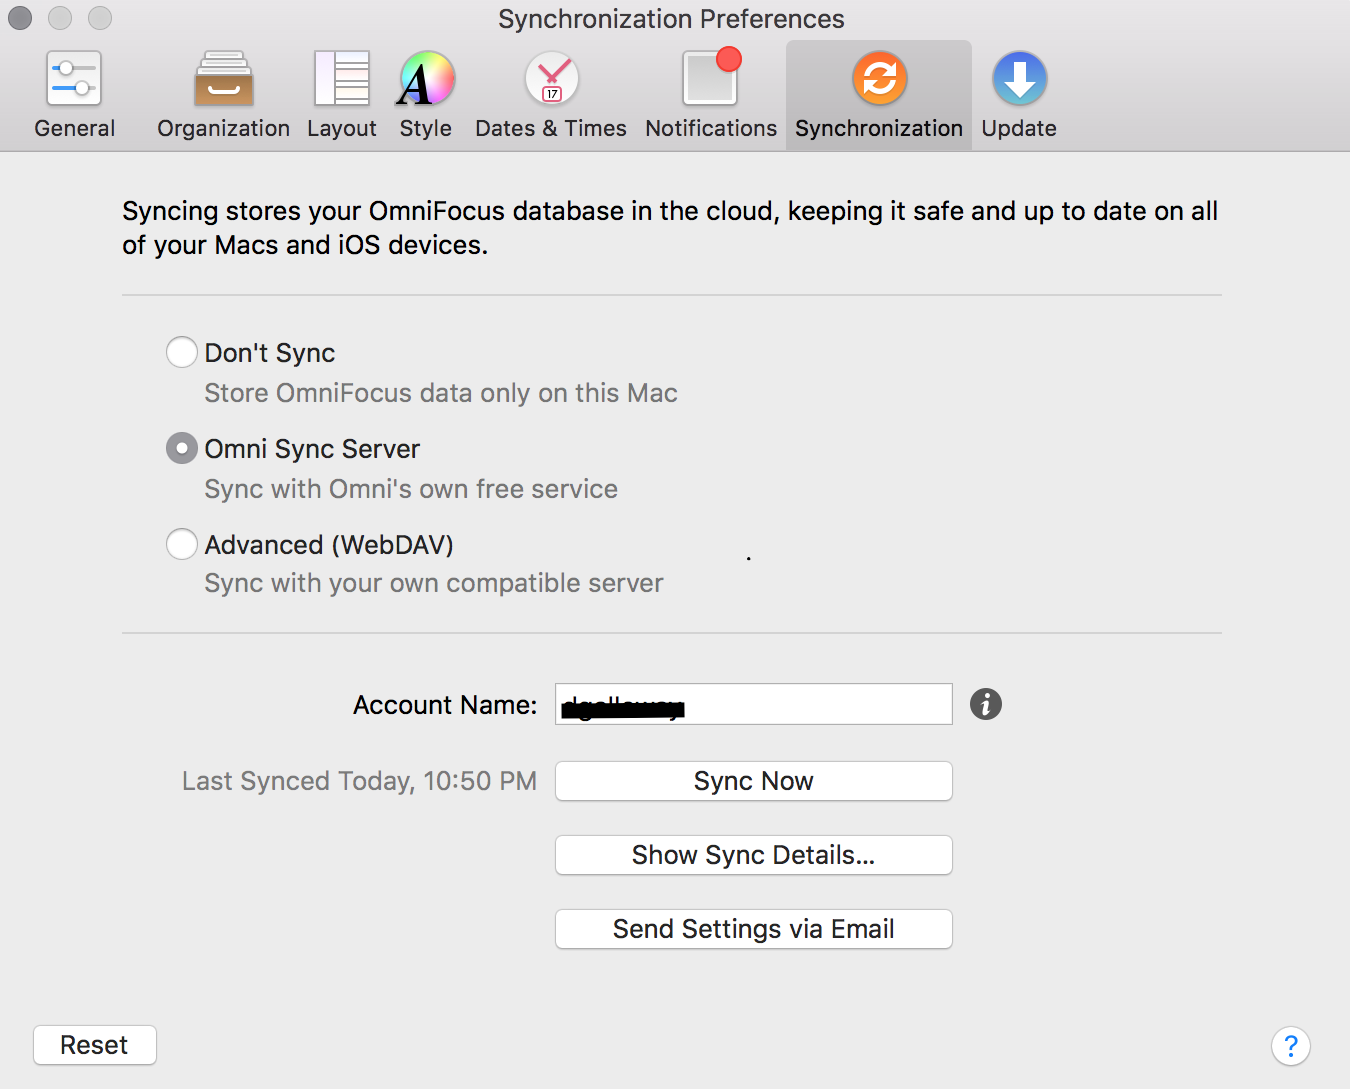
The first time you open OmniFocus, you'll need to decide how you want to back up and sync your tasks. The best way is with the Omni Sync Server. It's a free service to sync your OmniFocus account, and it lets you add new tasks via email (more on that later).
Just go to sync.omnigroup.com and create a free Omni Sync Server account. Then open your OmniFocus Preferences (press CMD + , on your Mac, or tap the gear icon on iOS), select Synchronization, then choose Omni Sync Server and enter your account details.
One more thing: on iOS, select the Push option in Settings, and turn it on to make sure your tasks sync in the background automatically.
If you only want to use OmniFocus on one device, you could not sync it if you'd like. Alternatively, want to handle your own OmniFocus syncing? You could sync to your own WebDAV server instead—here's a guide to set up your own sync server.
Setting up Notifications
OmniFocus can remind you when tasks are due—and much more. It includes detailed notification options on both Mac and iOS, so you can get notified about exactly what you want.
There are two main ways OmniFocus can notify you: With a normal notification, and with a number on its app icon. It can notify you about overdue, due soon, or flagged tasks—and which ones you want to be shown as notifications and icon badges. You can also have OmniFocus add due tasks to your calendar if you'd like your notifications there.
That makes it easy to customize notifications the way you want. On my Mac, for example, I only have Dock icon badge notifications, relying on my iPhone and Apple Watch (but not my iPad) for due task reminders.
As always, remember that untended notifications grow like weeds and can take a toll on your productivity. I enable notifications for Overdue, Flagged, and Due Soon tasks—but am also quite selective about which tasks are flagged or have a due date. This means that when I receive an OmniFocus notification, I know it’s something I should pay attention to right away.
Keyboard Shortcuts
You can click and tap your way around OmniFocus, but you'll be faster if you use keyboard shortcuts—and being more productive is the whole reason you'd want to use an app like OmniFocus.
That's why there are a plethora of keyboard shortcuts for OmniFocus. For quick reference, here are the ones you'll need the most:
Complete a Task:
Spacebarto mark a task (or Action, as OmniFocus calls tasks) completeQuick Entry Shortcut:
Control+Option+Spacebarto quickly add a task from anywhere on your Mac (note: you can customize this in your OmniFocus settings)Quick Open Shortcut:
Command+Oto quickly search through and open your tasks, projects, and perspectivesClean Up:
Command+Kto clean up your project or perspective to remove completed tasksSwitch Perspectives:
Command+1throughCommand+6to switch your view to the main six default perspectives (Inbox, Projects, Contexts, Forecast, Flagged, Review)New Action:
Command+Nto add a new action or task in the currently selected project or inboxNew Project:
Shift+Command+Nto create a new projectDuplicate:
Command+Dto make another item just like the selected one; works with actions and projectsSet/Clear Flags:
Shift+Command+Lto flag or unflag a task or project
Be sure to also check the full list of keyboard shortcuts for both OmniFocus for Mac and OmniFocus for iOS.
Searching within OmniFocus

The Quick Open shortcut mentioned above is one of OmniFocus' most handy tools. It's the easiest way to jump into any section of your project, perspective, context, or folder. Just type what you're looking for, and the search results are narrowed in real time. You can also add a custom shortcut for Quick Open, if you'd like.
Quick Open only searches for task, project, context, and perspective titles, though, and doesn't look at the notes on your items. For that, you’ll need to use the Search box on the top of OmniFocus—which you can select by typing Option + Command + F. That'll search through everything in your current OmniFocus perspective. To search through absolutely everything in OmniFocus, select Projects in the sidebar, click the View button in the toolbar, and select All, then search for the thing you're looking for.
To search on iOS, just swipe down from the top anywhere in the main screen or project views to reveal the Search bar and change View settings.
How to Add Tasks to OmniFocus
Now that you know your way around OmniFocus, it's time to start adding your tasks and organizing them into projects. OmniFocus has ways to quickly capture new tasks, whether you're on your computer or on the go.
Let's take a look at the many ways you can capture tasks.
Quick Tip: OmniFocus calls tasks Actions, based on GTD terminology, as they're things you need to take action on.
Capturing with OmniFocus on Mac
The simplest way to add tasks is with the New Action button in the top toolbar. Click it—or press CMD + N in a project, inbox, or Forecast view, and type in your tasks. To add another tasks just press Enter after typing in your first task.
New actions include several fields: the task name, project, context, defer and due date, and the option to flag the task. You can press tab to jump between those fields—or, click the task and you can add extra info in the right sidebar.
Need to add a number of tasks quickly? You can type them in a plain text list, and paste them into OmniFocus to turn each item into a task. Or, if you use OmniOutliner—the outlining app from the company that makes OmniFocus—you can drag-and-drop your outlines into OmniFocus to turn them into tasks and projects.
The simplest way to add tasks, though, is with the Quick Entry shortcut. Just press Control + Option + Spacebar from any app to open the Quick Entry pane, then type in your task name and other details.
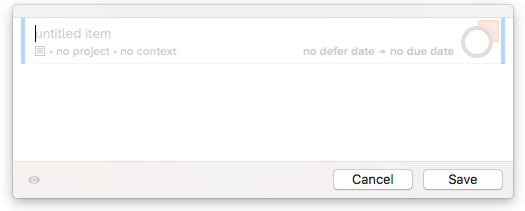
Without taking your hands from the keyboard, you can add tasks anytime you think of them. While working on my Mac, this is the quickest way for me to capture new tasks.
Capturing via Email with Mail Drop
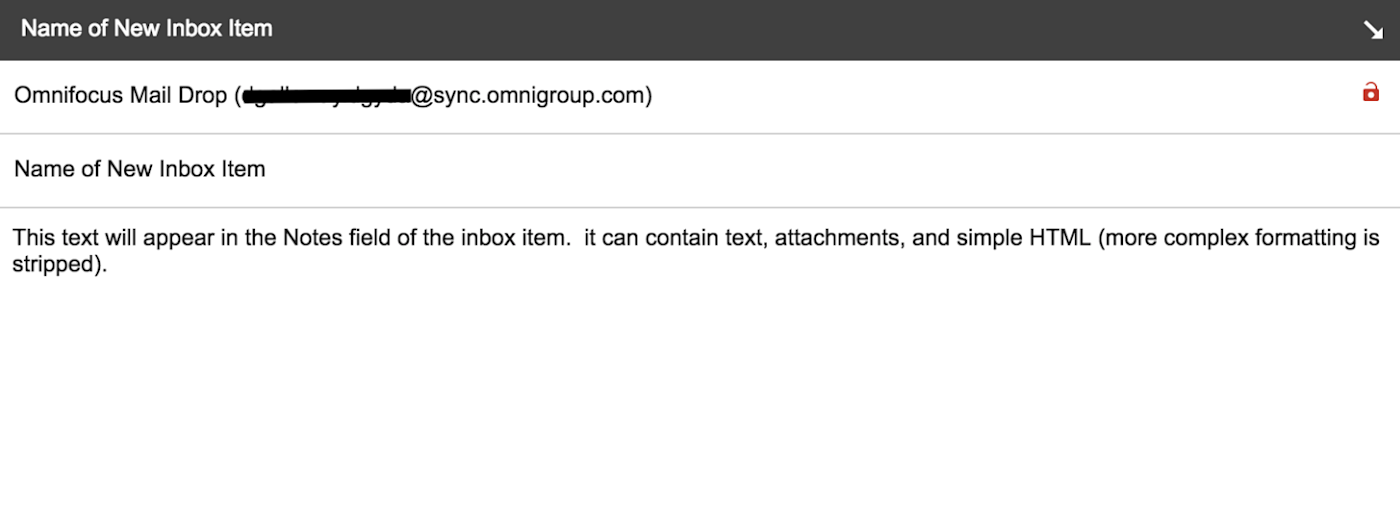
Another great way to add tasks is by sending an email to your OmniFocus Mail Drop address. That lets you forward any email to a secret @sync.omnigroup.com email address and turn it into a task. It's great for not only emails that prompt actions—such as project emails and bills you need to pay—but also for letting others send you tasks directly. And it's the perfect way to add tasks when working from a device that doesn't have OmniFocus installed.
To set up Mail Drop, open your Omni Sync Server account and click Add an Address under the Mail Drop settings. OmniFocus will make a randomly generated email address with your username—and you can add multiple addresses if you'd like.
When you send an email to this address, OmniFocus will add a new task to your Inbox with the subject line as the task name and the body of the message as the note—including attachments and basic formatting.
Want to turn emails in your Inbox into tasks? Just install OmniFocus’s Clip-o-Tron add-on, then select the email in your Mail app, press Clip-o-Tron's shortcut, and it'll be turned into a task with a link back to the original message.
Capturing via Other Apps
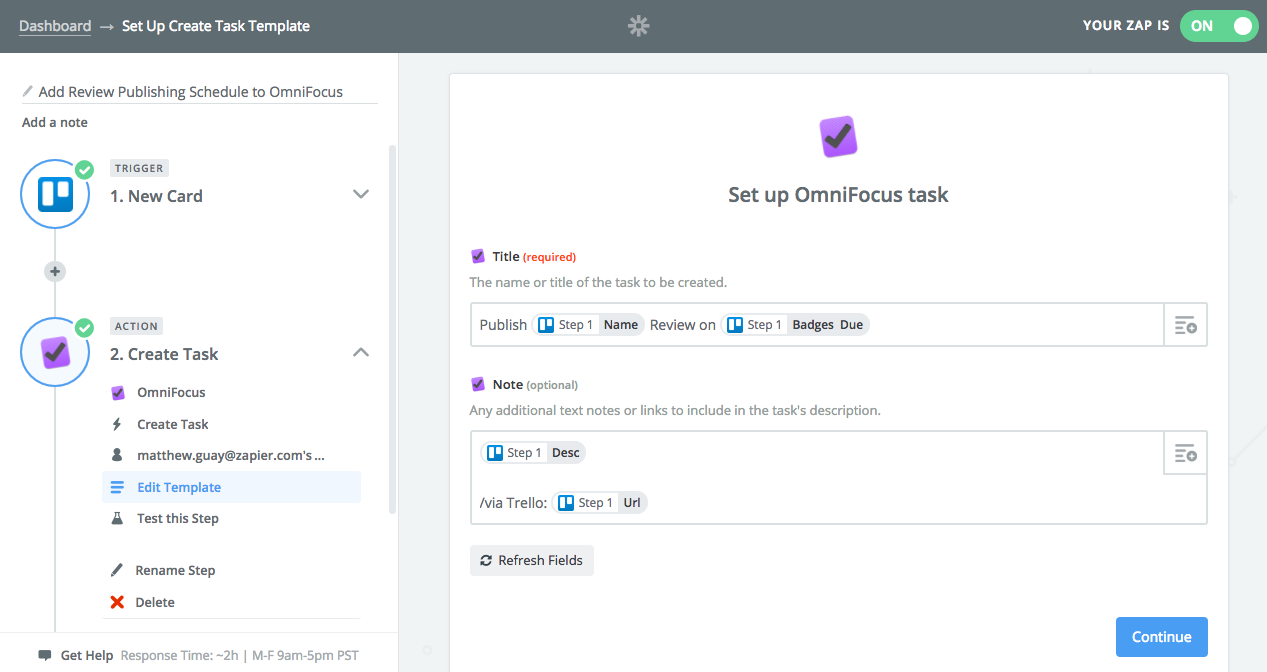
Using that same Mail Drop email address, you can also integrate OmniFocus with your favorite apps using app automation tool Zapier. Zapier's OmniFocus integrations let you watch thousands of apps for new projects, documents, notes, and more, and then turn those items into new tasks in OmniFocus. Here are some great integrations to help you get started.
Create OmniFocus tasks for new Google Calendar events about to start
You can even connect other to-do list apps and project management tools to OmniFocus. That way, if you write tasks in your Gmail inbox or have a team task assigned to you in Trello, Zapier can save it to OmniFocus so you can organize it along with the rest of your tasks.
Create OmniFocus tasks from new or moved Trello cards
Create OmniFocus tasks for new tasks in Asana projects
Send new incomplete Todoist tasks to OmniFocus as new tasks
Want to automate OmniFocus itself? With the pro version of OmniFocus, you can use AppleScript in OmniFocus to find tasks, batch-edit tasks, and more—or on iOS, you can use URL schemes to integration OmniFocus with other apps.
Capturing on iOS
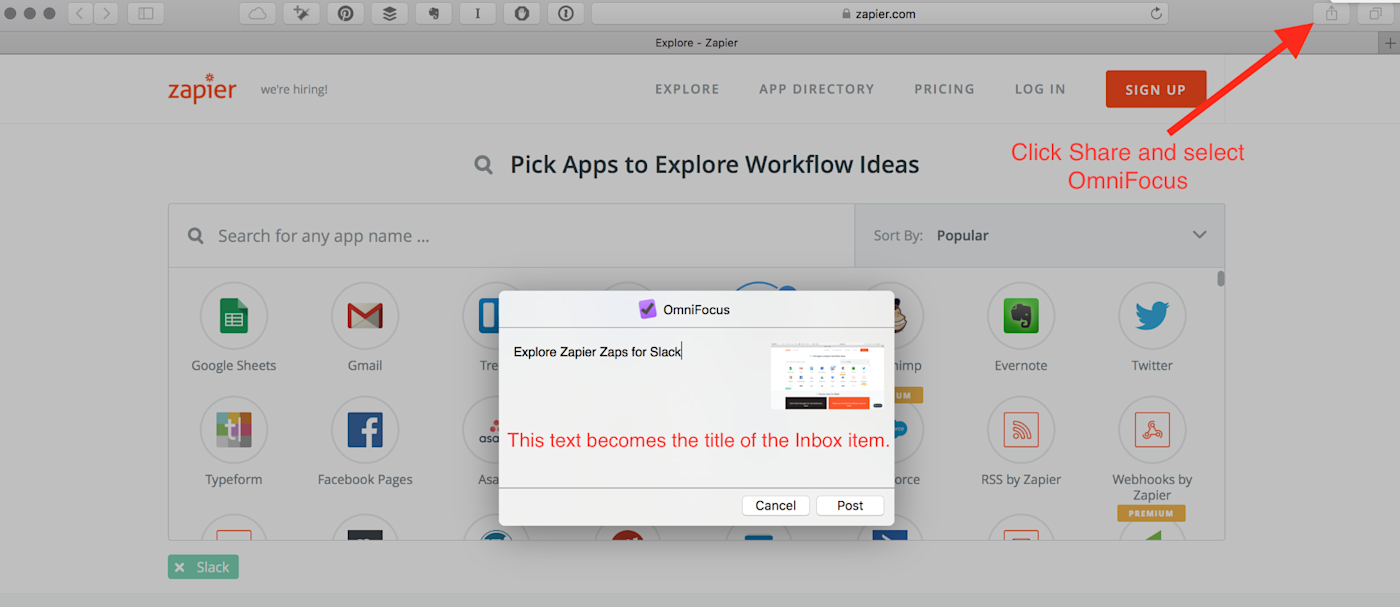
Just like in the Mac app, you can capture new tasks easily within the OmniFocus app itself. Most of the time when I want to add a new task on mobile, though, I'm working in another app. As such, the simplest way to add tasks is with the iOS Sharing Menu.
First, just tap the Share button, then scroll to the end of the list of apps and tap More, and tap the on switch for OmniFocus. Then, next time you want to add a task, just tap the Share button, select OmniFocus, and enter your task name. Your task will include a link to the item you were looking at, for an easy way to jump back to the site or app that prompted you to think of the task.
You can also add tasks from OmniFocus' iOS widget in your notifications pane. And if you have an iPhone 6s or newer with 3D Touch, just press harder on the OmniFocus item and select New Inbox Item to quickly add a new task.
Capturing via Siri
An even simpler way to add a task is via Siri—though you'll need to enable it first. Open OmniFocus on iOS, pull down from the top of the home screen and select Settings. Scroll down and then select Reminders, turn it on, and select which Reminders list to watch for a new task.
Then, just tell Siri to "Remind me to do your task on the time it's due." With any luck, Siri will recognize what you said and the task will be added to OmniFocus automatically.
Capturing via Apple Watch
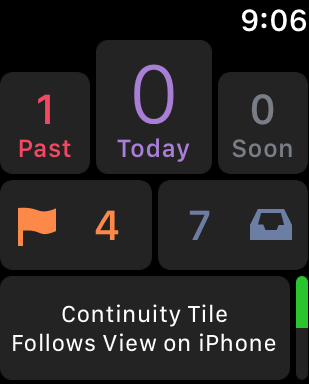
If you have an Apple Watch, you can capture tasks on the Watch by force-pressing the OmniFocus app’s home screen to add a New Inbox Item, just as on your phone. That will start recording your voice, and will turn whatever you say into a new task in your inbox.
The best option, though, is just to use Siri, as that lets you add a task along with a due date using the same voice recognition.
How to Clarify Tasks in OmniFocus
Now that you've added your tasks to OmniFocus, it's time to clarify them.
According to David Allen, there's one question to ask yourself when thinking about a task: "Is this actionable?" Not every task you add to Omnifocus will be relevant when you sit down to process your inbox; maybe you hastily added something that didn't end up needing to be done, or the circumstances changed in the meantime.
So just double-check yourself. Make sure the task really does need to be done by you before organizing it. For everything else, you might want to copy it to a notes app like Evernote for future reference.
Clarify the Title and Define the Next Action
Then, make sure the task makes sense. Perhaps you added a vague title or maybe the task includes FW: from an email subject line. Go ahead and edit that action item's title and write it in an active voice for clarity.
It's easy to write the desired outcome instead of what needs to be done to achieve that outcome. Say you wrote Chicken Tikka Masala as a task—that'd be better written as Find a Chicken Tikka Masala recipe or Make Chicken Tikka Masala for dinner on Friday depending on your goal.
Tip: Is the task actually part of another task—something that you need to do to accomplish the larger task? Just drag that task to the right under the task to make it a sub-task.
Add Defer and Due Dates
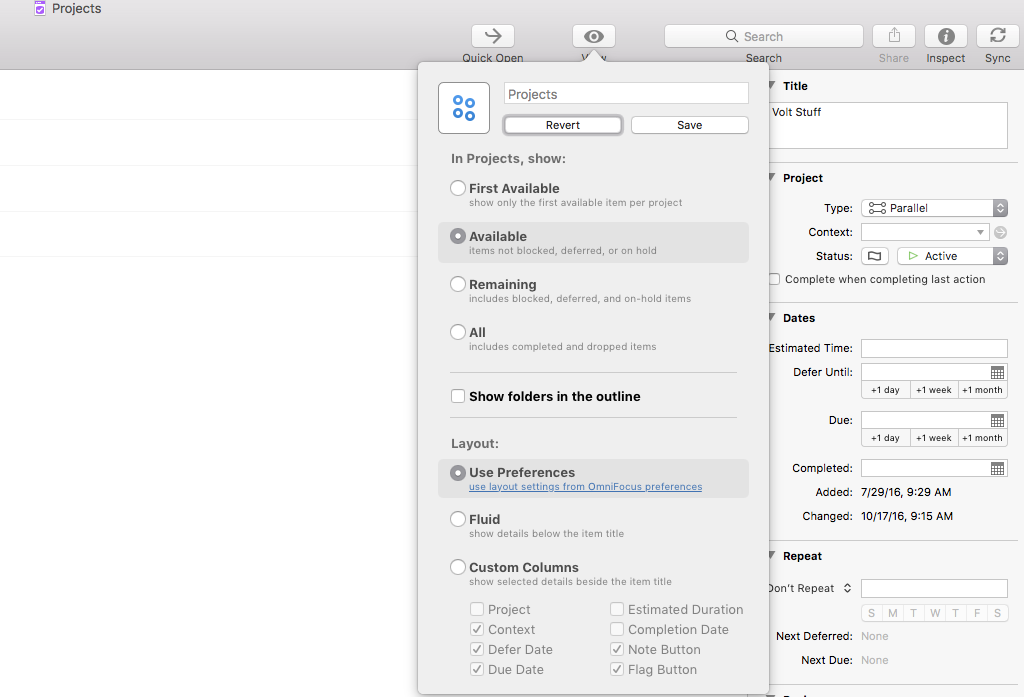
Now it's time to think through when the task should be done. OmniFocus includes two dates for each task and project: a Defer and a Due date. Most people are familiar with due dates—they're when the task needs to be finished. Defer dates—otherwise known as Start dates—are when you should start working on the task.
If my driver’s license expires on December 13th, the due date for the task would be Dec 13. But maybe I should renew it earlier if possible. I could add a defer date for Dec 1, and OmniFocus will remind me about the task both on December first and thirteenth.
For both dates, you can specify a fixed date (say Dec 1 or 12/1/2016) or a relative date (such as tomorrow, next Monday, or even +3m for three months from now). Just type in a word, phrase, or number that'd make sense for the date, and OmniFocus will likely figure it out. Or use the calendar widget in the sidebar to select an exact date. You can also type in specific times for tasks—useful to schedule your entire day's work or to remind yourself to visit the DMV before they close.
Tip: Here's OmniFocus' guide to the supported date and time syntax formats.
Set Repeating Tasks
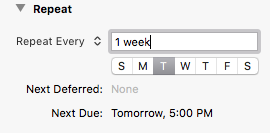
Need to do a task regularly—such as backing up your computer or submitting your timesheet or invoice? Turn those tasks into Repeating tasks so you only have to add them once.
Just select the task to see it in the sidebar, then scroll down to the Repeat section. You can choose from Repeat Every, Defer Another, or Due Again depending on what you want.
Repeat Every simply recreates the task when you complete the original task, for the dates and times you select. Defer Another will defer that action for the selected time before making it available again—to remind yourself before something's due. And Due Again creates another task due the period of time you set after you completed the task.
Say you want a task to be due every Tuesday and Thursday of the week. You'd select Repeat Every, type in 1 week, then select the dates (T and T for this scenario) when you want it to be due that week. Or say you need to change your water or air filter every 6 months. You'd use Due Again and type in 6 months and the task would be due again 6 months after you change the filter. OmniFocus is pretty versatile in this regard--moreso than many other to-do apps.
Add Flags if Needed
Flags are a simple way to highlight specific tasks without having to set a Due Date or to prioritize your most important tasks that do have a due date. Use flags whatever way works best for you.
Just click the flag button on a task to flag or unflag it, and you can then see all flagged tasks with the Flagged perspective in the sidebar.
One great idea is to flag items that you want to complete that day, as OmniGroup staff members said they do. You can then make a custom perspective to show "flagged items or items due today" to make a "Do Today" view.
Flags are very adaptable. You don't have to add them to tasks, but they're a great way to highlight tasks in a flexible way.
Tip: Want to set flags and due dates for multiple tasks at once? Simply select them all and choose the settings you want in the sidebar.
How to Organize Your Tasks into Projects
Now, it's time to get your tasks organized. Most to-do apps let you group tasks into lists and perhaps add extra categorization with tags.
OmniFocus does that with its projects and contexts. Each task can be part of a project and can have one context. The project will list it with other tasks that, together, will help you accomplish a common goal (perhaps "Redesign Website" or "Land Deal"). Contexts let you tag tasks that require similar actions (say an "email" context for tasks in all projects that need an email response).
You can create a new project or context just by typing its name when adding a task. Or you can turn a task into a project with the CMD + ! keyboard shortcut. Then, you'll want to add more details to get the most out of those projects and contexts. Here's how:
Creating New Projects in OmniFocus
Projects in OmniFocus include the same tools as tasks. You can add a name and description, flag the project, set defer and due dates, and even have the project repeat itself. Additionally, you can mark projects as Active, On Hold, Completed, or Dropped; that way, only tasks from Active projects will show up in your Forecast view's due list.
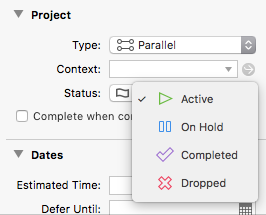
OmniFocus also includes three types of projects: Sequential Projects, Parallel Projects, and Single Action Lists.
Parallel projects work much like a task list in other to-do list or project management app. You list everything that needs to be done, and can check off the tasks in any order you want. If you set your view options to only show the next task, though, Parallel projects will show only the top task in the list.
Sequential projects, then, are for projects where one task must be done before the next. You'll list the tasks in the order they need done, and can only check off the top task until it is completed. The other tasks won't even show up as due tasks in your Forecast view unless you've completed the tasks before them.
Single Action projects are for everything else. They're almost the same as parallel projects, since all of the tasks are available to check off anytime you want. However, it's designed for ongoing projects, and all tasks will show up if you set your view options to show next tasks.
Tip: Want to set a due date for all the tasks in a project at once? Just set the project's due date, and those tasks will all show up as due on that date. For Sequential projects, OmniFocus will only show one task due at a time, too.
Organizing Projects
You can then organize projects by dragging them into the order you want—and can even drag a project into another project to make a sub-list of tasks. Also, you can create folders and subfolders to organize projects as deeply as you want.
I like to build a project framework with folders and nested projects to organize everything and give structure to my tasks. Here’s an example of a simplified framework I’ve used in the past:
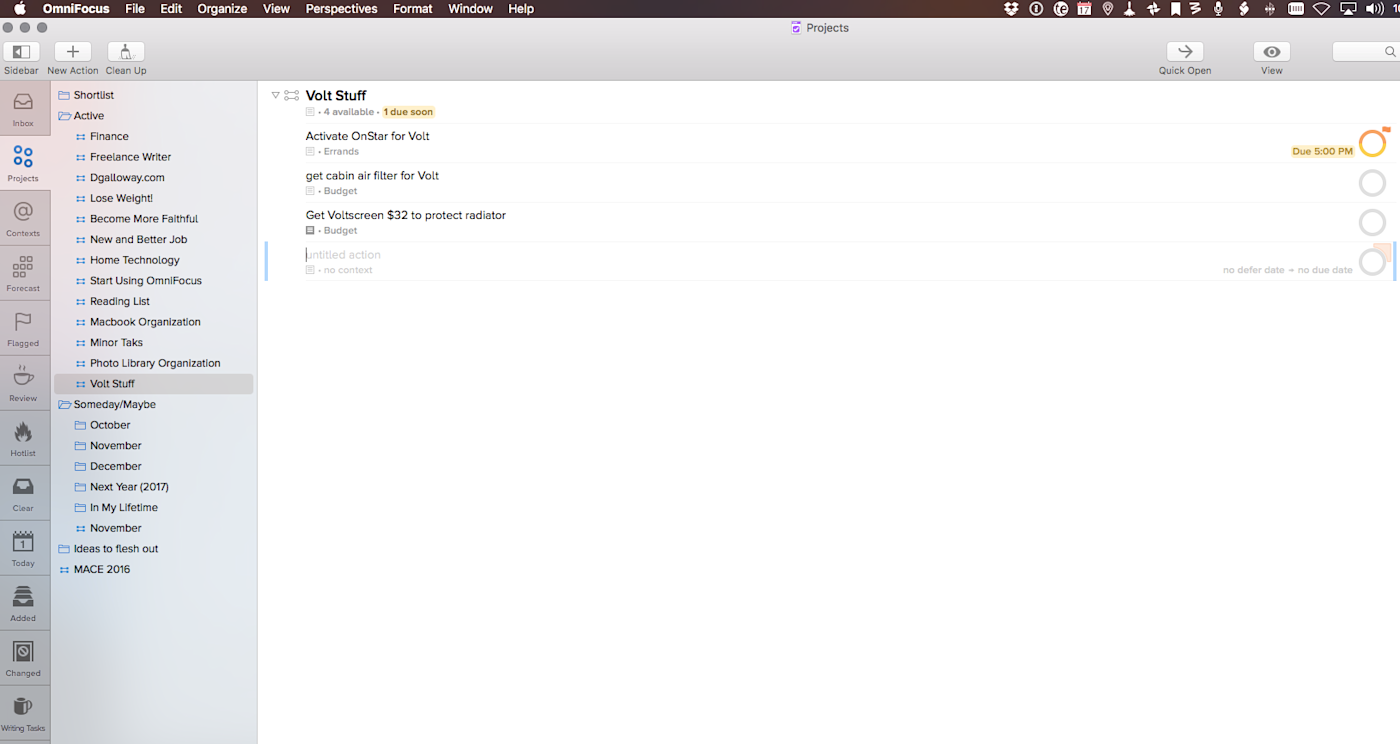
You'll need to figure out your own system to keep tasks organized—and here some more tips about how to set up a great folder hierarchy to keep things organized.
Creating Contexts
Contexts can seem confusing, but it's important to remember that they are really just tags. That’s it. They're just a simple way to categorize tasks.
The original Getting Things Done book suggested contexts like @Office, @Home, @Phone, or @Mail to group similar tasks. When you're at your office, you’d prioritize your tasks with the @Office context from any project. When you're writing letters, you’d check your @Mail context to see if anything needed to be sent out.
You can come up with your own contexts that make sense for your tasks—and just type in the context name. OmniFocus uses @ as the symbol for contexts. Contexts only include their name, along with a status so you can mark all tasks with one context as Active, Dropped, or On Hold. And, you can drag contexts over and to the right of another context to make it a sub-context; add a longform context under writing, for example, and tasks with either context will show up when you select writing.
Building a Context Workflow
There are a wide variety of ways to use contexts to organize your tasks. Here are some of the most popular, along with ideas on how you could use them.
Tool contexts fit the original idea of GTD contexts perfectly. You can add an email context for tasks that need you to write an email and work through them all together while your Mail app is open. Need to do something from a mobile app—perhaps create a mind map, as I prefer to do from my iPad? Add an iPhone or iPad context for the correct device.
Energy contexts let you choose tasks based on the time you have available or how much work you feel like doing right now. A simple 5min context for short tasks might be enough. Or use the contexts SimplicityBliss suggests, including ShortDashes for short tasks, BrainDead for monotonous tasks like filing documents, and FullFocus for when you need uninterrupted time for deep work.
Waiting contexts can help you mark a specific task as sequential, even when it's in a non-sequential task. Say you’re waiting for someone else to finish their tasks before you can continue a project. Add a Waiting or OnHold context to those tasks so you'll know to skip over them for now—and then be sure to review this context regularly.
Location contexts let you mark tasks that need to be done at home, your office, or even things you need to purchase at a specific store. You can get as specific as you'd like. My Work context, for example, includes nested contexts for Boss and my coworker Jim so I’ll know what to bring up to them when we’re in a meeting together.
You can add generic locations, or you can actually set the real locations using your iPhone's GPS. Open the OmniFocus app, tap Contexts, and then select the context you want. Tap its name, and you'll see a setting for the location. You can then tap Here to mark this location as the one for that context, or can search for the location you want.
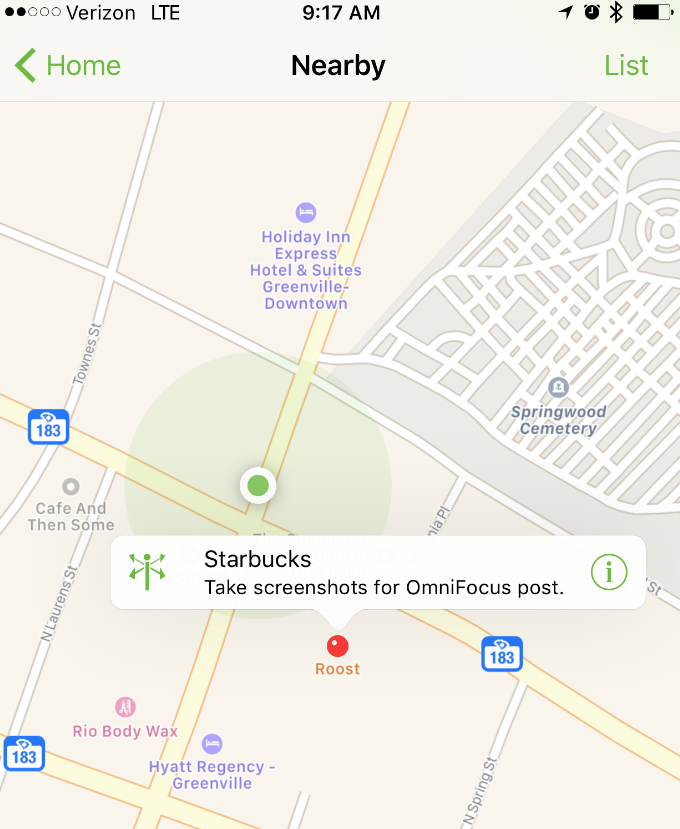
Now, back on the OmniFocus home screen on your iPhone, you can tap Nearby to see all tasks that are nearby. You can also then set your notifications settings to notify you about tasks when you're near their context, for a handy way to make sure you don't forget to pick up the milk at the store.
Use Perspectives to See What Needs to Be Done
Projects and contexts help you see the order of your tasks that need to be done, and how you should get them done. OmniFocus also includes another tool to organize your tasks and view what you want: Perspectives.
Perspectives let you display OmniFocus tasks according to a set of parameters you select. Want to see all flagged tasks, the tasks due today, or the flagged tasks in your Work project with the writing context? You can make a perspective to see just that.
OmniFocus' Default Perspectives
Fun fact: the default Inbox, Flagged, Forecast, and other views in OmniFocus are actually perspectives.
The Inbox perspective is where tasks go by default—it shows all tasks without a project. The Projects and Contexts perspectives each show all of your projects and contexts, and their related tasks, respectively. Flagged, Changed, and Completed each show flagged, changed, or completed tasks as you'd expect.
Forecast is the most unique perspective. It organizes your tasks into a list of tasks for each day and also shows your upcoming calendar events for each day. You can toggle which calendars you wish to have displayed in the View settings. Need to reschedule a task? Just drag it to a new date in the calendar.
Review is another unique perspective—we’ll cover that in depth in a bit. It shows all your projects that are Active or On Hold so you can make sure those tasks are still relevant and get a quick overview of how your projects are coming along.
The final two default perspectives are Completed and Changed, and these show the tasks you’ve completed or altered since the beginning of your current OmniFocus session. They’re great if you accidentally complete a task or assign it to the wrong context or project.
Create Your Own Perspectives

Custom perspectives are in many ways the "killer feature" of OmniFocus—and are a great reason to upgrade to the pro version ($79.99 instead of $39.99). They let you create views to see the tasks that are best to work on now and are a great way to make OmniFocus work the way you want.
To create a custom perspective, click Perspectives in the OmniFocus menu, then select Add Perspective. You can add a name, select an icon you want or add your own (here's a nice free set of icons to try), and choose your view options. Among other settings, you can create a projects hierarchy, focus on specific projects, choose how to group and sort tasks, select which columns you want to see, and filter tasks by text, date, and more.
Here are some perspective ideas:
I have a Clear perspective that shows all tasks that are due today, without any organization. If an emergency strikes and I can’t do anything else today, I open the Clear perspective, select all of the available tasks with the Command + A keyboard shortcut, and defer them all until tomorrow. It takes around five seconds to defer dozens of tasks. This is also great when you’re about to go out of town—pull up this Perspective, flag and add due/defer dates to the important things you have to take care of and do a batch defer of the rest. (Hat tip to David Sparks for sharing both of these perspectives.)
Another really useful custom perspective is Brett Kelly's Stalled. It shows any project that is active but doesn't have a defined next action. This way you can review all of those projects together and choose a next action for each.
It’s hard to accurately express how powerful these three custom perspectives are until you start using them—and make your own to show the tasks that you need to do.
Here's another perspective workflow for inspiration from the OmniFocus blog.
Review Your Progress in OmniFocus

The last and perhaps most important step in the Getting Things Done workflow is reviewing your tasks. The Completed perspective lets you see the tasks you've checked off, and it's good to check the Inbox for tasks you might otherwise forget—and for everything else, there's the Review view.
OmniFocus' Review perspective shows all of your active and on hold projects and lets you easily review them. When you're adding new projects, you can set how often they should be reviewed—the default is once a week. When that's due, they'll show up in your Review perspective, where you can look at each of the tasks, add or edit anything you want, then click Mark Reviewed to move on to the next project.
You can do a review from any of the OmniFocus apps. You might add tasks from your phone, and check them off during the week on your Mac. Then, I find it refreshing to review projects on my iPad from the hammock in my backyard.
No Weekly Review, No GTD
No matter how or when you do your review, the important thing is to do it. David Allen says in the book that "if you’re not doing your weekly review, you are not doing GTD." Leo Babuta of Zen Habits takes it a step further saying, "if you are not reviewing your goals weekly, you are not focused on achieving your goals."
It's easy to find your work overwhelming and not know what really needs to be done next. Reviews help prevent that. If you stop and take a few minutes to review your projects, you’ll know exactly where you stand on your current obligations and have a better gauge on whether or not you should feel stressed about those commitments. You may find you actually have less on your plate at that moment than what you thought.
Do that again next week, and you'll always know what to take action on next.
Conclusion
OmniFocus is an incredibly powerful app, with a price tag to match. As just a to-do list, it might feel like overkill. However, when you create sequential projects and organize their tasks into location-based or other contexts—along with custom views and notifications that aren't overwhelming—it can be a powerful tool that helps you stay productive.
The most important thing is finding a workflow that fits your tasks and keeps you on track. You can add tasks to OmniFocus from anywhere, organize those tasks by exactly how they need done, and review everything to make sure you're achieving your goals. It's using all of that together that can help you accomplish more.
Learn More About Productivity
Learn how to stay productive over the long term—something that often requires a variety of tricks, including a system like GTD.
Want to use GTD on paper? This article will show you how to do that.
Need to keep your entire team productive? Our guide to project management systems will help you learn how to break down team tasks and get them done effectively.
